Crafted this workbench following Jay Bates’ workbench design. Southern Yellow Pine with beefy through-mortise and tenon joinery pegged with shims and dowels. Finished in two coats of Natural Danish Oil. Next stages include accessorizing with bench accessories and a leg vise. My inspiration – Jay’s Custom Creations http://jayscustomcreations.com/category/woodworking-2/woodworking-how-to-projects/shop-how-to-projects/. I flattened the top and will add a leg vise following his other video guides on that page. Thank you Jay!

The original plan called for a trestle style legs. I reasoned that I would shorten or lengthen the 1″ pads on the feet to accommodate for an garage floor uneveness and wear/tear over the years. After reading several woodworkers forums on workbench design I ramped up the leg thickness to support the 4″ thick top. The design change on the fly worked out in my favor in simplifying the build and I thankfully did not screw up the dimensions as I progressed.
thankfully did not screw up the dimensions as I progressed.

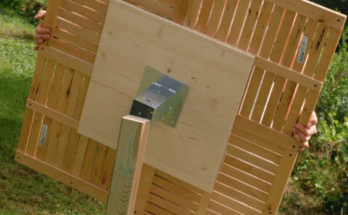
You can see the square mortise and tenon joinery I had intended from the beginning in the top.

The dimension changes in the plan took place AFTER I had bought the stock. I had a mix of 2×6″s and 2×10″s. I had made several cold trips to HD by this point and had come to terms with the stock I had on hand. So I decided to just go with it.

Top rough cut from 2x10x10″s.


The 2×10″s ripped down the middle to give stock for almost 30″ wide.

The milling and joining for the top had gone well with the jointing and planing sequences but I had a major hiccup along the way. At one point I had 2 12″ sections ready to join together. I had taken them to the table saw to get them exactly to 12″ but the blade deflected on the passes through and the mating sides came out of square – an error I didn’t catch until the next morning. This shot was the first glue up of the top. This took the top assembly from one to nearly three days.

First time using the jack plane. A small 1/32″ ridge down the middle persisted after the third top glue up.

Leg glue up.

Stretchers and side rails glued up. There’s 4 side rails shown here. 2 were used for the bench. The remaining 2 were intended to be used for the trestles. After scrapping the trestle idea I saved the rails for another project I’ll put up some other time.

Legs, stretchers, and rails eating up shop space.

Legs glued up.
Legs glued up.

Keep a firm hold on your router and go slow in small chunks… This happened twice on the outside faces of the legs. Laura Kampf http://laurakampf.com/ has a saying somewhere in her shop “Every imperfection deserves attention”. I left these scars visible as a reminder of the lessons learned.

These were my first through-mortises hogged out with a router and refined with chisels. I learned a lot of lessons about hand-toolery from Paul Sellers and started to put them into practice here.

I worried a lot here because my initial layout with a framing square was not lining up correctly. I eventually found that the square was not square – 1/16″ out of square at 24″. I switched to the drywall square to locate these mortises but I was doubtful on the accuracy.

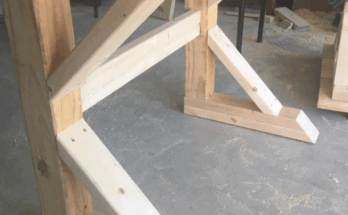
Legs and side rails all mortised and tenoned! These went well however the cross rails… not so much.

The original plan called for square mortise and tenons. I cut the long stretcher tenon to a square shape. It looked way too spindly and I reasoned that it would not be adequate to support the weight and forces throughout the bench. What does one do when too much material is removed? Build it up!


Getting the tenons back in shape.

It’s not going to win any beauty contests but lessons were learned and the tenons were rebuilt.


The leg assemblies unnerved me. The mortises tenons were sooo tight that I did not dry fit them all the way before starting the glue up. I took a leap of faith and glued them up sinking them into the top mortises dry for alignment purposes and glueing up the side rails.


I skipped the dry fit on the stretchers as well taking the glue up on faith.

I used a new Stanley sweetheart block plane to chamfer the legs. Very satisfying. After the legs dried I cut off the tenon end and pegged the rails and stretchers with 1/2″ oak dowels. I considered draw-boring them but I skipped the dry fit and threw out the draw bore idea this time.

Had a friend come over and help flip this beast rightside up. We glued and pegged the top mortises and tenons in place. Alignment was near perfect and square! Can you see the odd couple of tenons?

Once the assembly dried I cut off the tenons coming through the top. Once even I hit it all with a wipe down of mineral spirits and I instantly loved the grain changes everywhere.
down of mineral spirits and I instantly loved the grain changes everywhere.

Major ground operations complete. “Mission Accomplished” right?

I used glue/sawdust to fill in major gaps and tearout throughout the bench. Some stand out and I would like to try something in the future akin to kintsugi – maybe mixing a dark walnut sawdust into the cracks and gaps.

Here she is – two coats of Watco Natural Danish Oil. More to follow as she gets outfitted with various accessories. Thanks for looking.